

vie-magazine-diy-hero
Home Projects Are In Again
Creating Your Perfect Backdrop
By Ainsley Rogers | Photography by Romona Robbins
It is well known that a home is a reflection of its owner; clearly, it is the creative and unique touches that separate a house from a home. The home does, of course, serve as a backdrop to daily life, and the smallest details enhance that. Each season, new home trends arrive like clockwork. New patterns, prints, and color schemes leave many homeowners longing to update their nests. Whether a home is set up for entertaining, raising a family, or as an intimate escape, expressing the personalities that occupy it can be done in creative ways that won’t break the bank.
This is just what VIE had in mind: an exploration of ways to freshen up old items most people have lying around their homes. Do-it-yourself (or DIY) projects have swept households across the nation, so we were eager to try out a few of our own. There is a therapeutic aspect to DIY projects—they allow one to participate in the creation of a fresh perspective on the home, whether it is already immaculately styled or just starting to come together.
Robert and Daryl Davis’s original Seaside home (featured on page 18) was the ideal backdrop for the DIY projects in our Home and Garden issue; the simple and inexpensive ideas created an interesting juxtaposition and enhanced the already perfectly styled home.
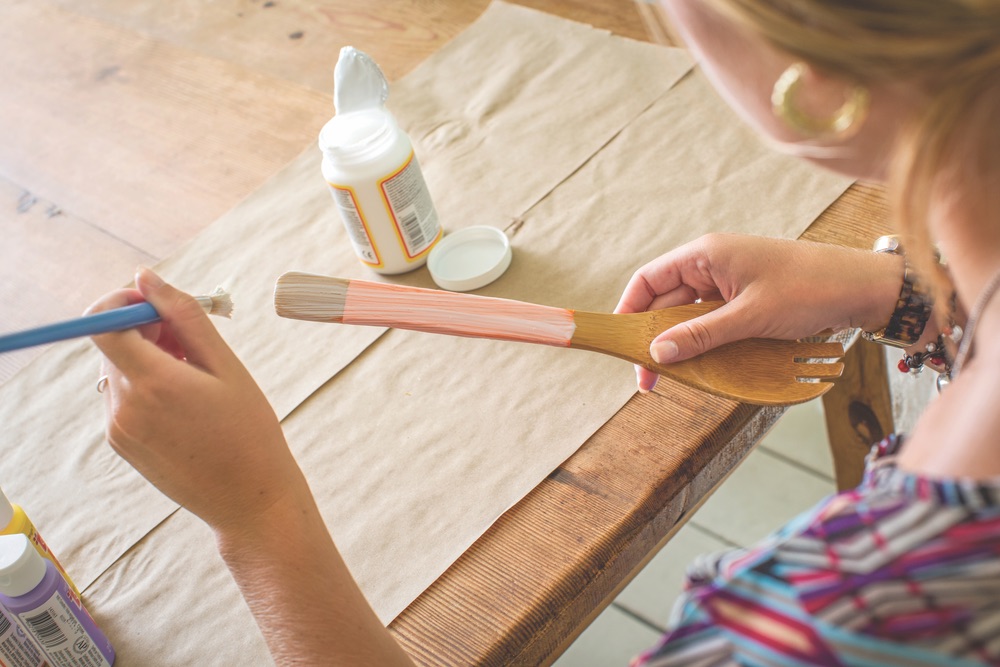
Color-Blocked Cookware
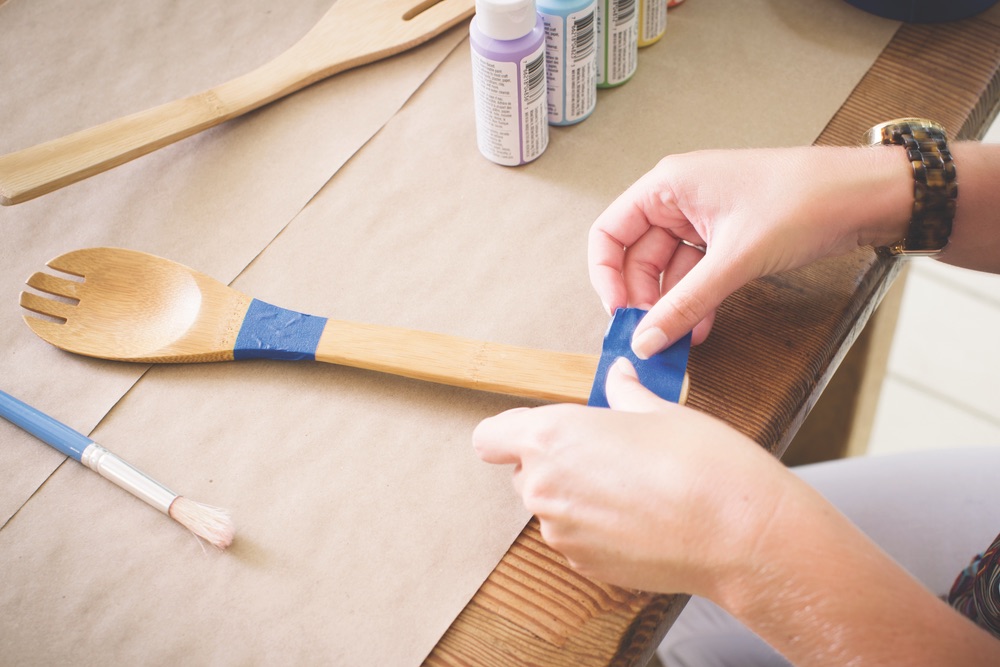
Incorporate the current color-block trend in your kitchen. Create colorful kitchenware by taping off portions of your old wooden kitchen utensils and painting them.
What you’ll need:
Wooden kitchen utensils
Acrylic paints
Clear sealant
Painter’s tape
Scissors
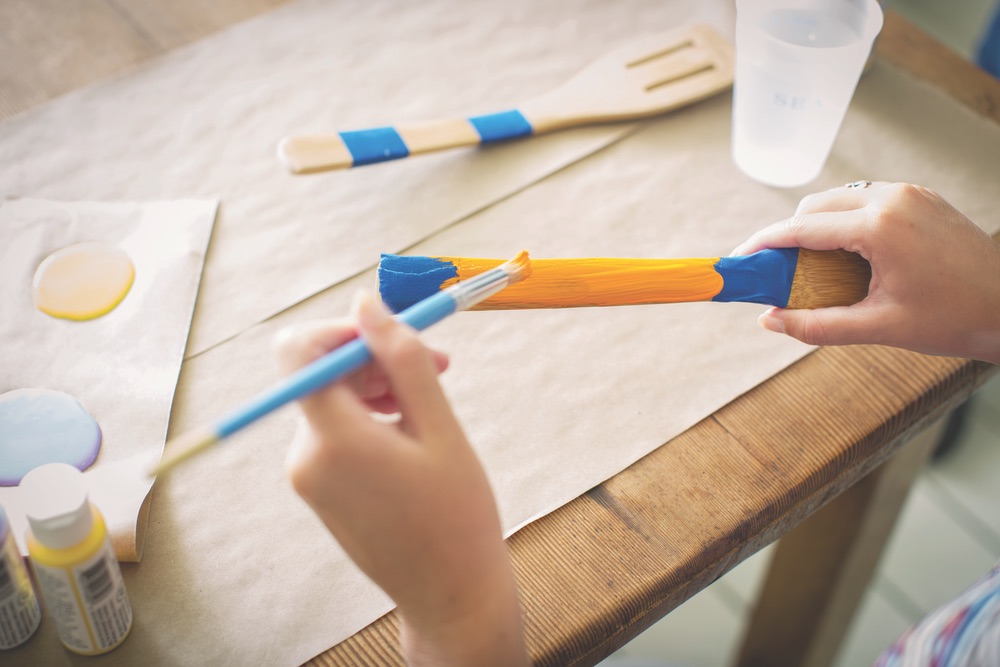
Do it yourself:
- After washing your wooden utensils, allow them to dry thoroughly. Use painter’s tape to section off areas on the utensils’ handles, depending on desired color combinations.
- Paint the designated areas with selected colors using a medium-sized paintbrush. Let dry. Apply another thin coat of paint.
- Gently pull off the painter’s tape. Finish with a thin coat of clear sealant over the entire handle. Let dry.
VIE’s Tip: Mix and match your colors for unique combinations!
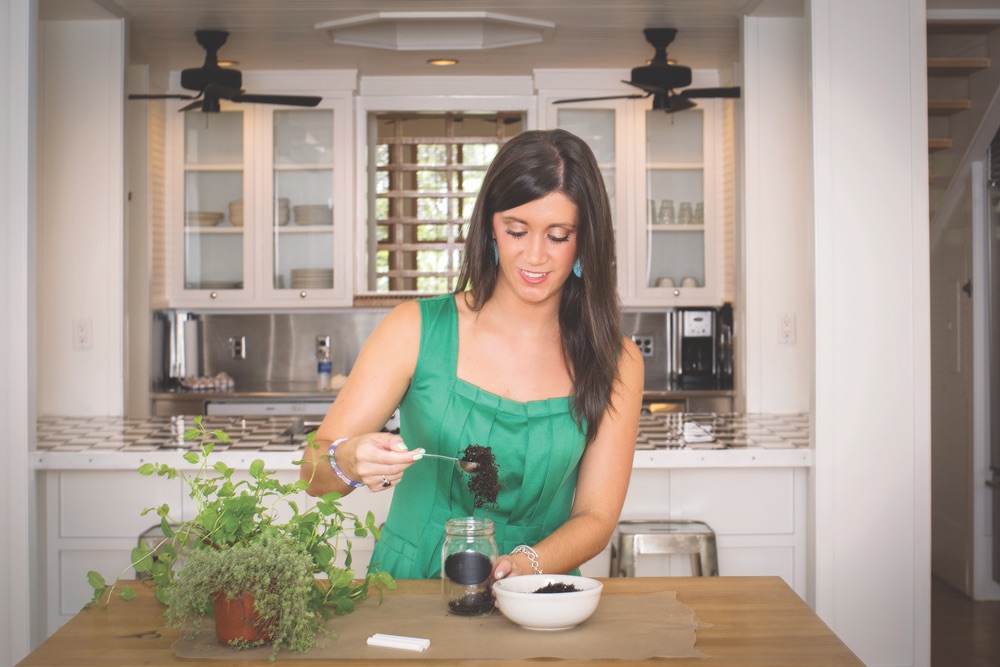
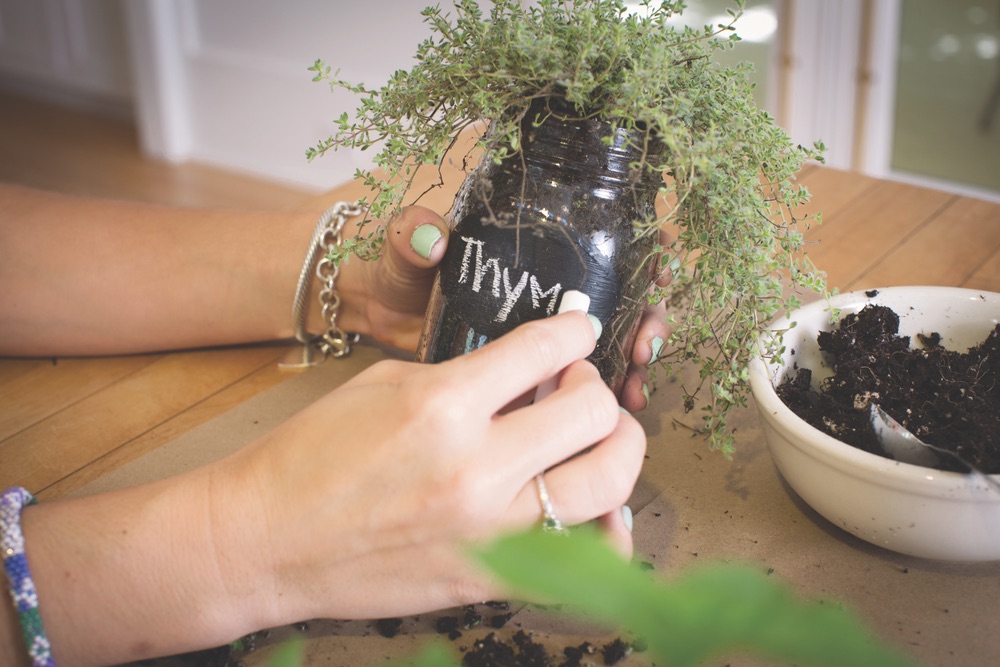
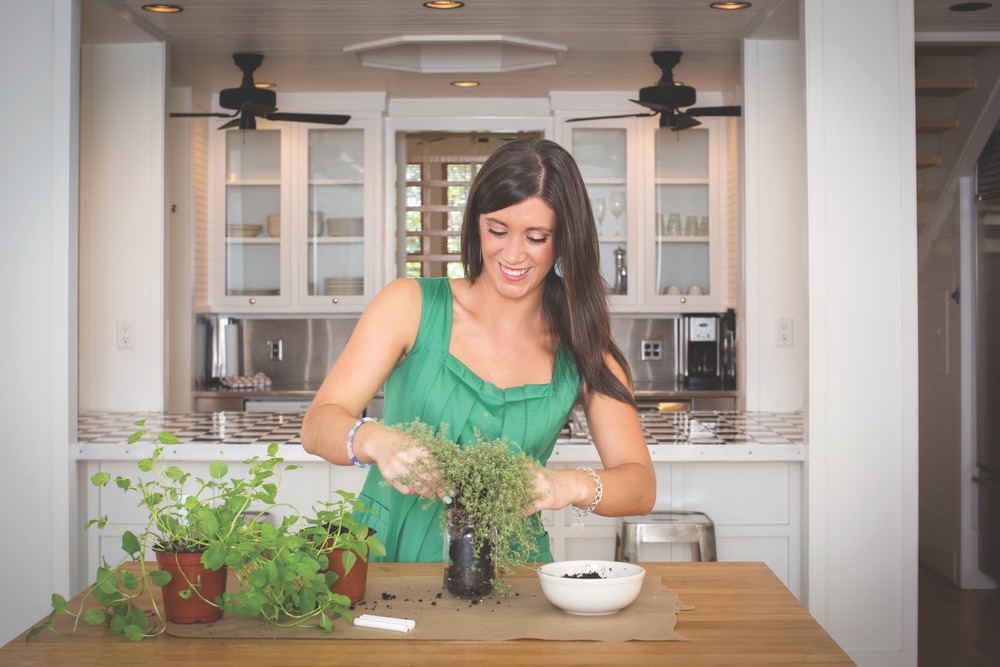
Mason Jar Planters
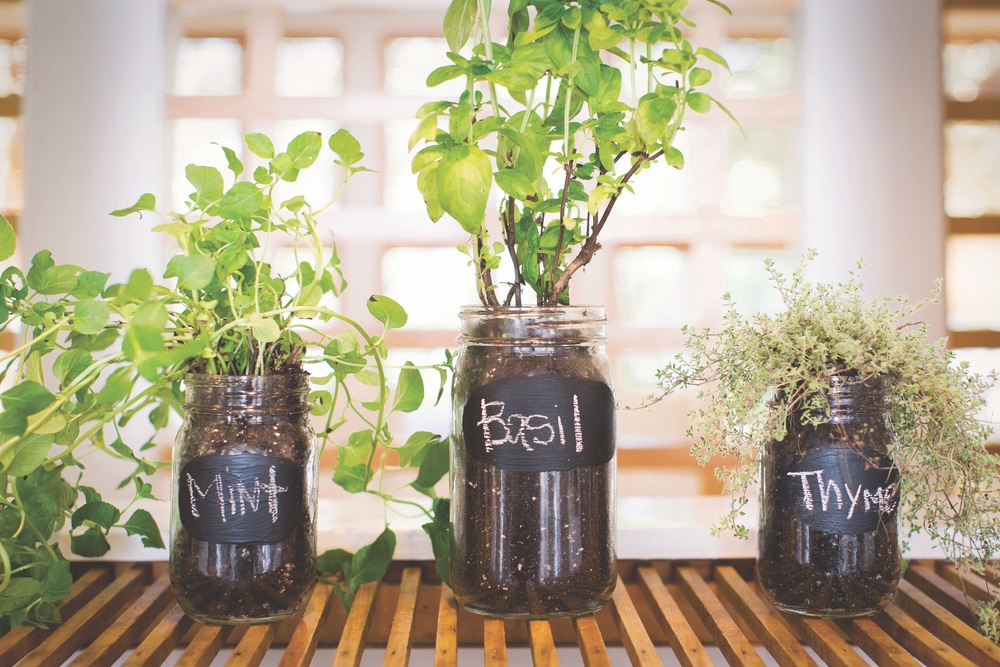
Showcase fresh herbs in your kitchen or on your patio. Recycle mason jars with simple labels for a practical yet charming display.
What you’ll need:
Mason jar (any size)
Chalkboard paint
Potted herb (shown here: mint, thyme, and basil)
Potting soil
Small paintbrush
Painter’s tape (optional)

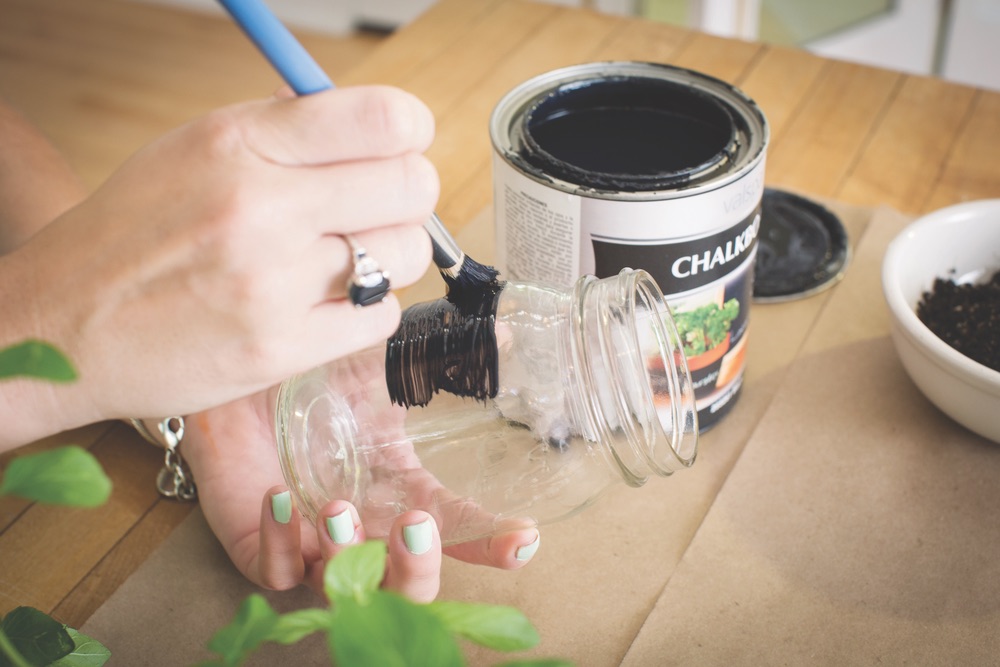
Do it yourself:
- After washing and drying the mason jar, paint a small, rectangular area with chalkboard paint. For those looking for a more defined line, use painter’s tape to outline the area. Let dry, then apply another thin coat.
- When the chalkboard label is dry, scoop potting soil into the bottom third of the mason jar.
- Take the herb from its container and settle it gently into the mason jar, pulling away excess soil from the roots so it fits comfortably into the jar.
- Label your newly potted herb with colored or white chalk. To erase or change, simply wipe the writing away.
VIE’s Tip: Using a drill, drill three small holes into the bottom of the mason jar to allow for water drainage.
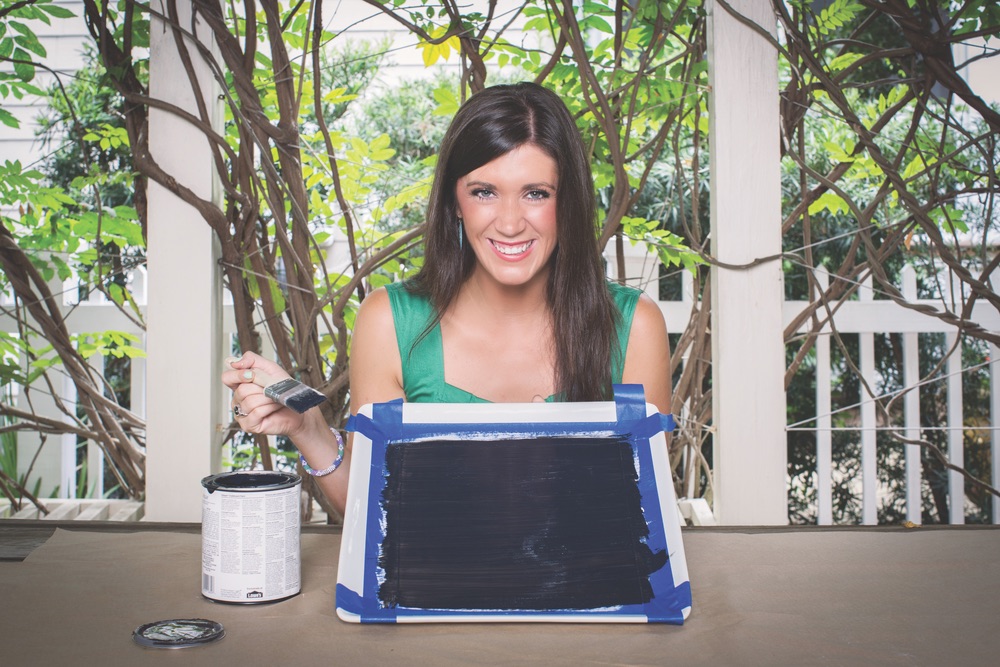
Chalkboard Serving Platter
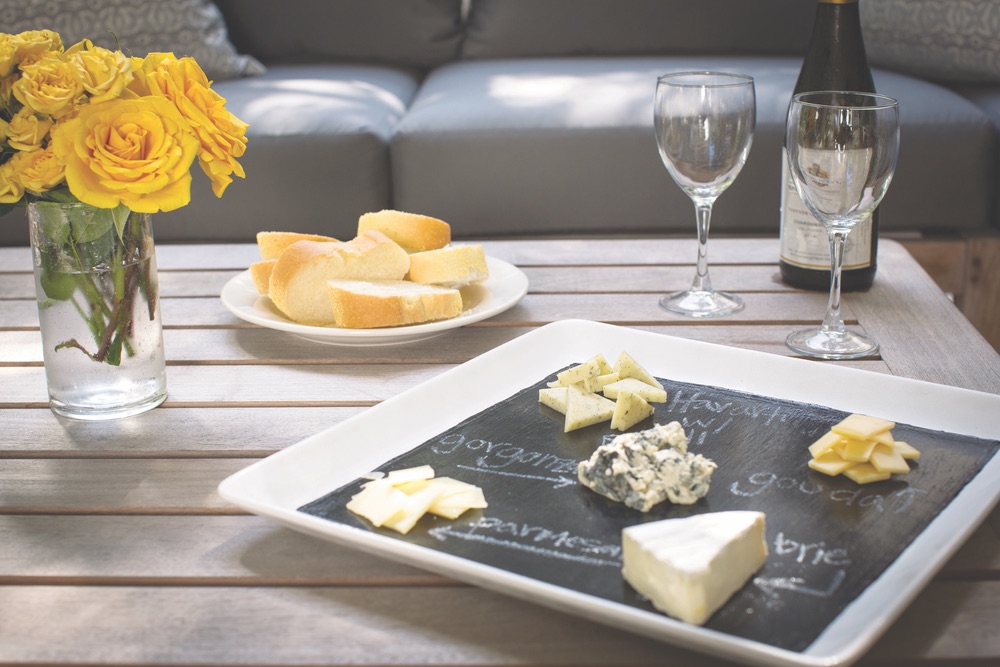
You’ll be serving your guests in style with this simple yet chic update to an everyday platter.
What you’ll need:
Painter’s tape
A large, soft-bristled brush
Sandpaper
Primer
Chalkboard paint
Chalk
Serving platter (featured here in porcelain)
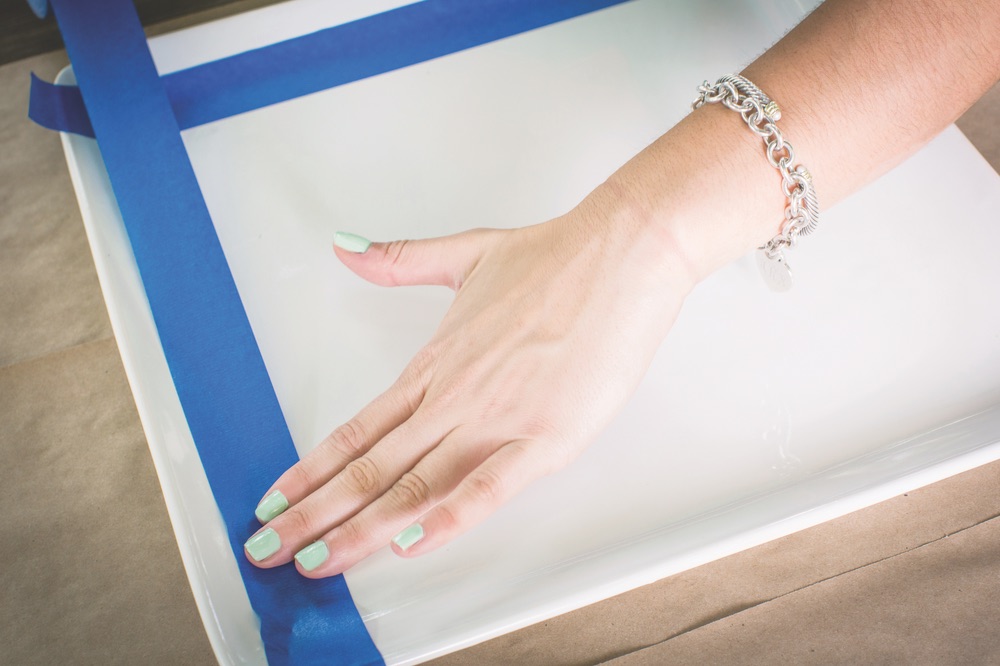
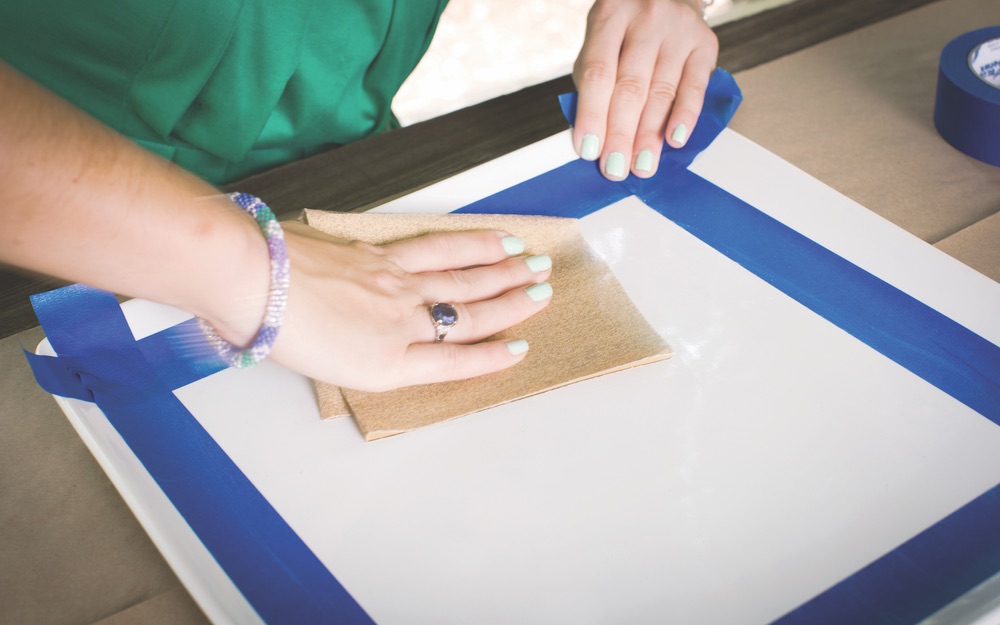
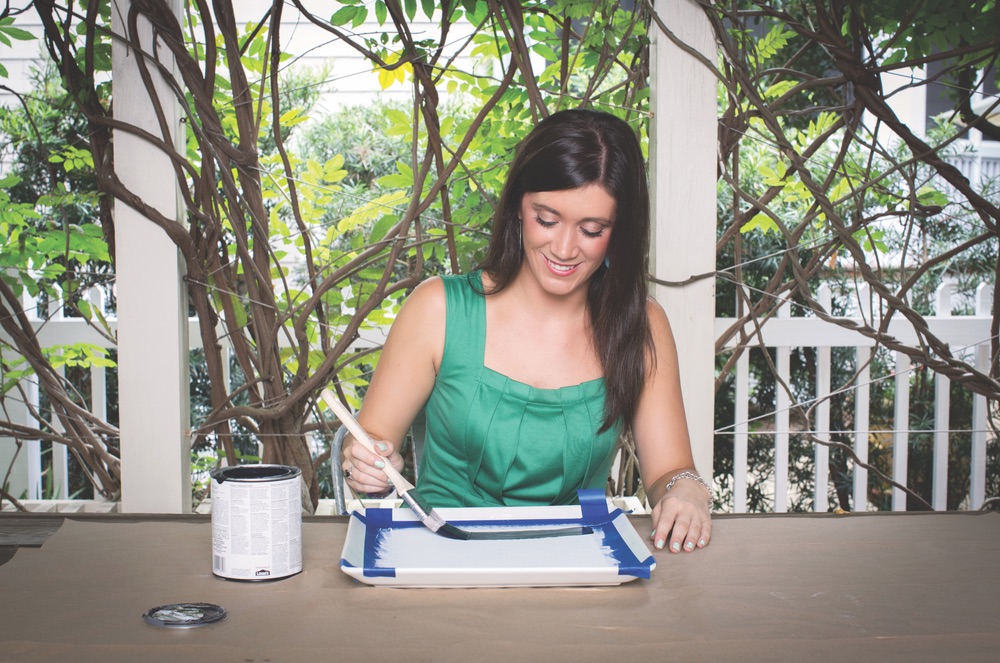
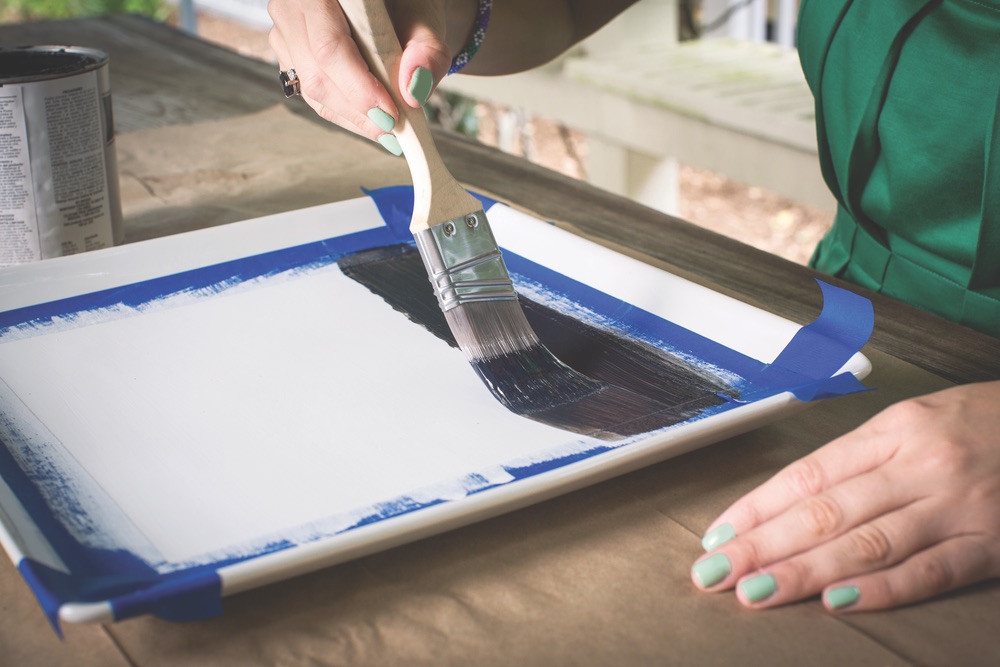
Do it yourself:
- After washing and drying the platter, tape off the edges with painter’s tape to ensure a straight edge.
- Lightly sand the predetermined chalkboard area. Brush away dust and sanding remnants.
- Apply a primer to the sanded area. Let dry.
- Apply the chalkboard paint with a large, soft-bristled brush in long, even strokes. You’ll be able to see the brush strokes even after the chalkboard paint dries, so apply as evenly as possible. Let dry. Apply a thin second coat.
- Let paint dry thoroughly. Then, gently peel the painter’s tape away from edges, making sure the chalkboard paint does not peel.
- Arrange cheeses, crackers, jams, and the like on the platter. Label each snack accordingly with chalk. To clean, simply wipe away.
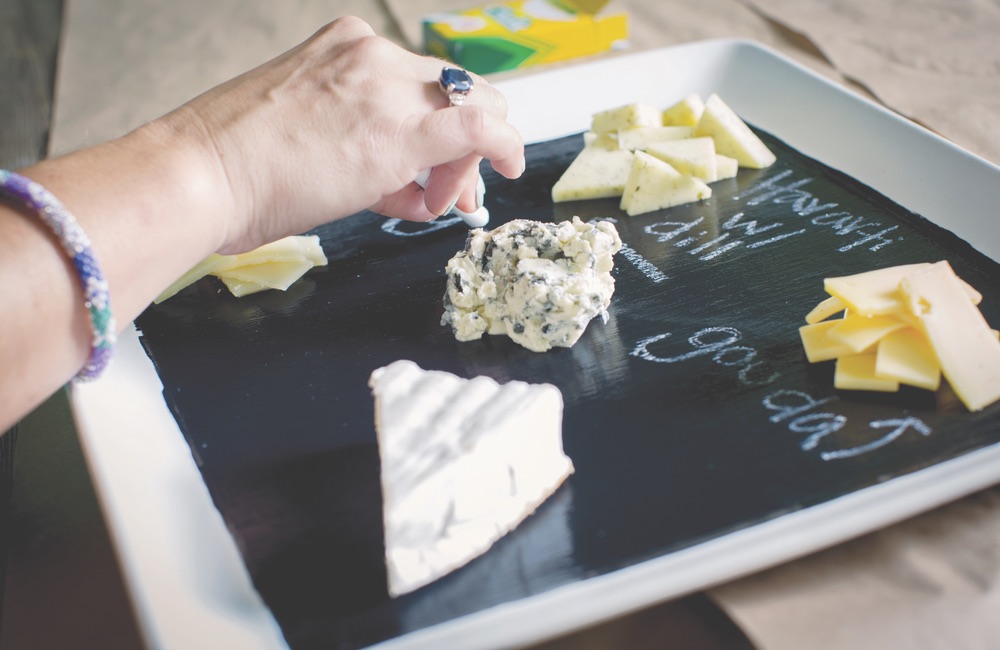
VIE’s Tip: Some chalkboard paint has a tendency to peel, so be sure to paint in thin layers using long, even strokes. We also used an extra sticky primer to ensure the chalkboard paint stuck to the platter. To further reduce peeling, use a small soft-bristled brush to outline the dry, painted area with chalkboard paint to seal the edges after peeling away the painter’s tape.
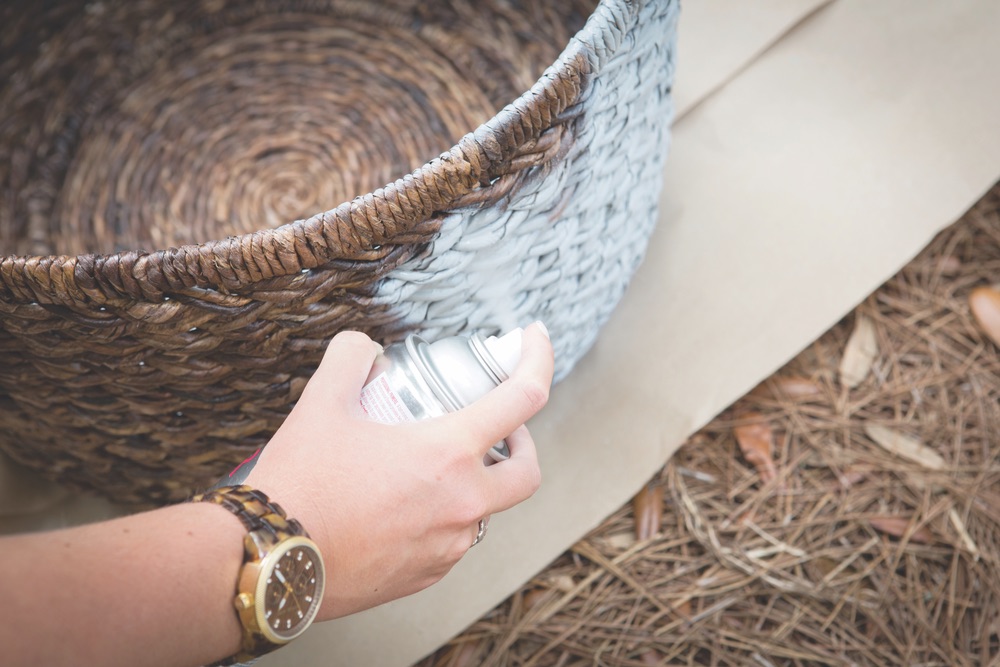
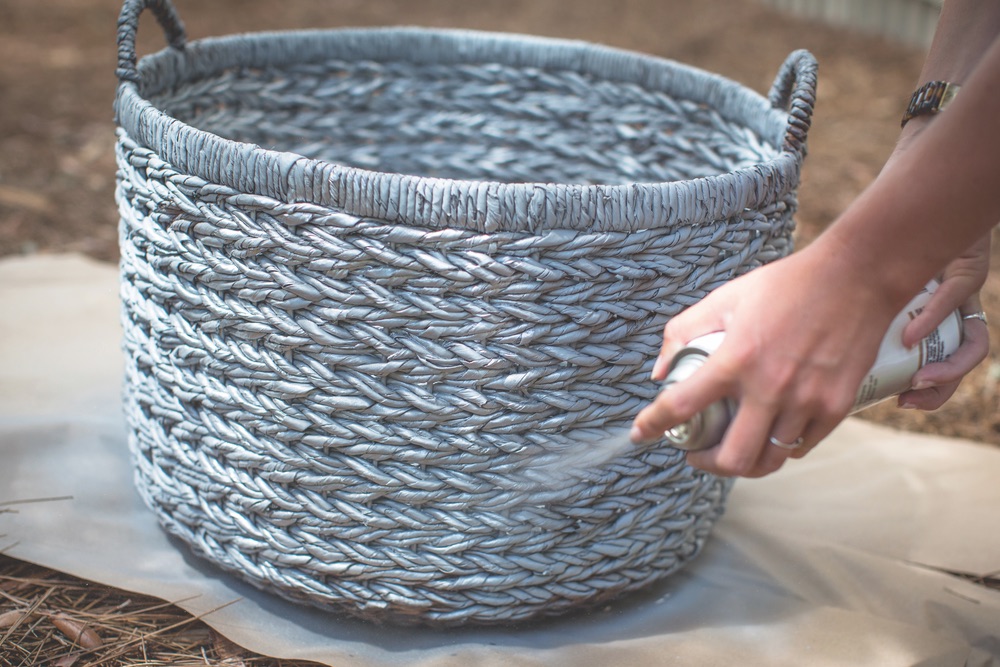
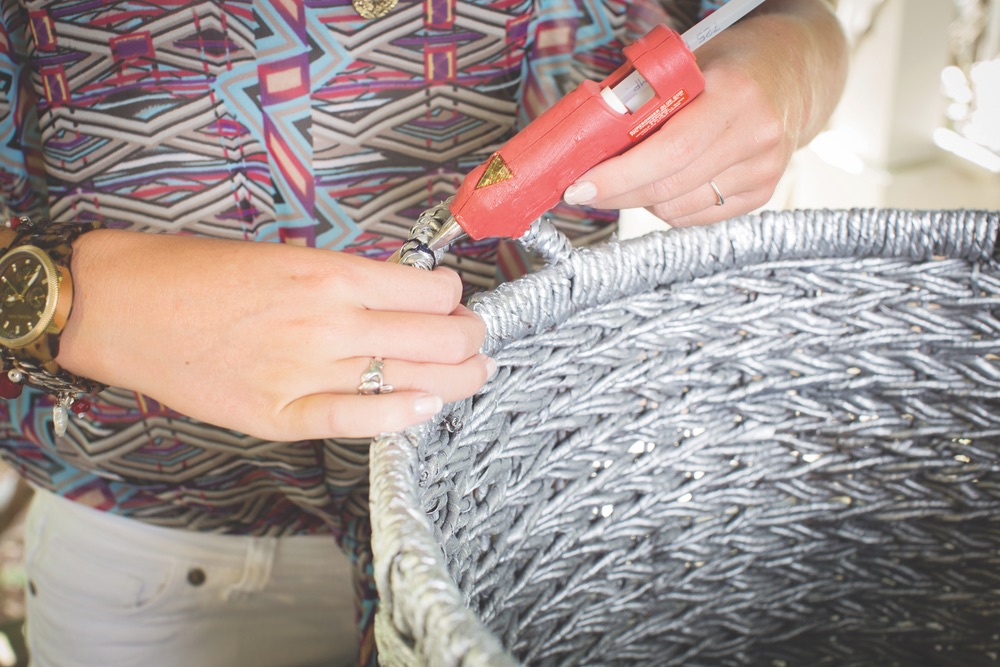
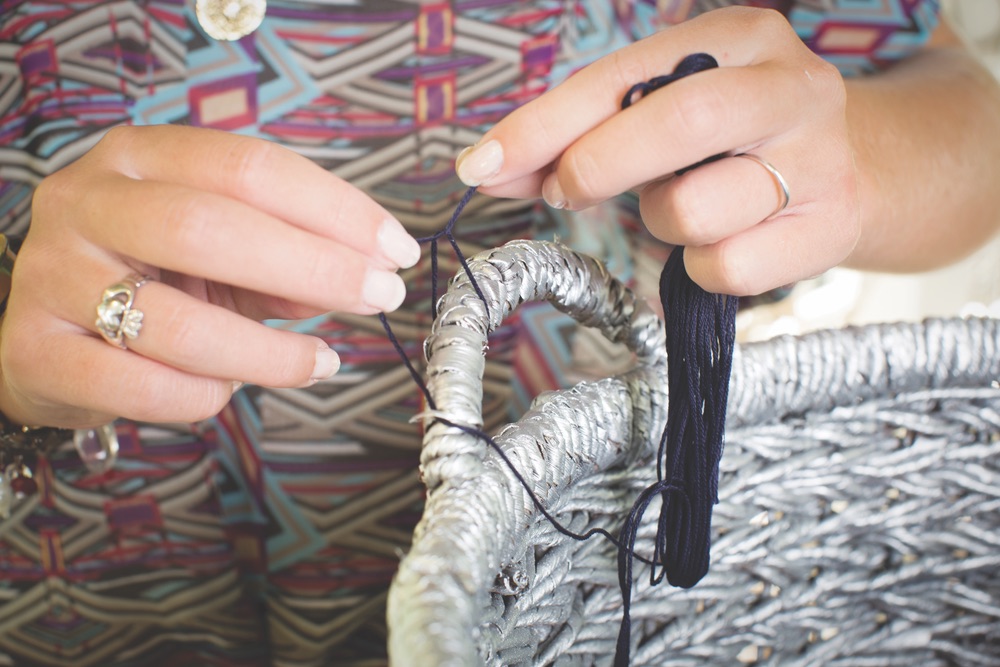
Metallic Basket with Hand-Wrapped Handle
Incorporate the metallic trend into your home by spray-painting old baskets in silver or gold—a really easy update to something you probably already have around the house! Hand-wrapped handles add the perfect luxurious detail to this project.
What you’ll need:
Basket
1 can of metallic spray paint (featured here in silver)
Primer spray paint
4 bundles of thread in desired color (featured here in navy)
Hot glue gun
Do it yourself:
- In a large outdoor area that is shielded from wind, spray-paint the basket evenly with primer. Let dry.
- Spray the basket with metallic spray paint from at least three feet away. This prevents dripping. Let dry. Apply a second coat if needed.
- Choose a location on the basket’s handle to begin wrapping the thread. (We chose to begin about two inches up from the base of the handle to create a color-blocked effect.) Using a hot glue gun, dot the glue on the underside of the handle and press the end of the string into it to begin.
- Begin wrapping the thread tightly and closely together. If the thread runs out, secure the end with hot glue on the underside of the handle, and begin wrapping the new thread in the same spot.
- Continue wrapping until you reach the corresponding location on the opposite side of the handle or until desired area is covered. Secure the end on the underside of the handle with hot glue.
- Use your new metallic basket to stow magazines, throw blankets, laundry, or anything else that needs a charming disguise.
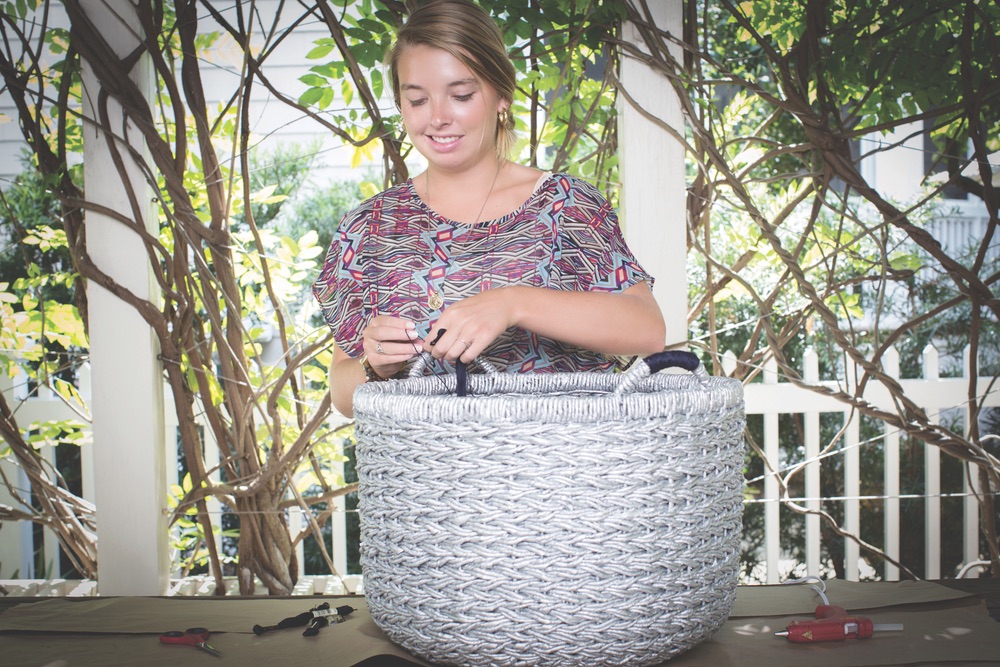
VIE’s Tip: Use a primer in the same shade as your metallic spray paint. To prime our silver metallic baskets, we used a gray primer, which provided more even coverage and allowed us to skip the second coat of metallic spray paint. To incorporate the neon trend into your home, try wrapping the handles with neon pink or yellow.
—V—
Creative Direction: Lisa Burwell and Ainsley Rogers
Project Development: Meghan Ryan, Emmett S. Hightower, and Jordan Staggs
Set Styling: Erica Pierce and Mackenzie Carter, with items from Pizitz Home and Cottage
A special thanks to Robert and Daryl Davis for the use of their Seaside home, to Chan’s Wine World in WaterColor for their food styling services, and to Clay on Highway 30-A for the use of the fresh herbs.
Share This Story!
KEEP UP WITH THE LATEST STORIES FROM VIE