

viemagazine-HERO9-min
Vegan Charcuterie Board
A Plant-Based Spin on the Trend
By Colleen Sachs
I love food. My memories of places I have traveled have always been as much about the food as the scenery. Whether cooking or eating out, I find joy in what I eat. And I am not a picky eater—other than my aversion to having milk on my cereal (when I was a child, my mother gave me a bowl of cereal and a glass of milk instead of combining them), there are very few edibles I wouldn’t try. So last year, when it became clear that I needed to stop eating dairy and eggs because of allergies, it took time to adjust to having limits on what I eat. I didn’t know if I could cook without those ingredients. So, I researched recipes without eggs and dairy and found a treasure trove of vegan and plant-based cookbooks, magazines, and websites. I learned how to make delicious food and decided to take the final step by eliminating all animal products from my diet.
I found I was in good company. More and more people are going plant-based, whether for their health or their concern for animals and the environment. It is easier than ever, thanks to an abundance of products at grocery and specialty stores, restaurant menus with vegan options that are much more than an afterthought, and excellent restaurants that serve only vegan fare.
Understanding that it is possible to have wonderful food made without animal products inspired me to get into the kitchen and start experimenting. While I enjoy things like tempeh and tofu—what my darling spouse refers to as “sticks and twigs”—I wanted to make food my omnivore friends would enjoy without feeling like they were missing anything. To that end, I created a vegetable, “cheese,” and “meat” board made entirely from plant-based foods.
This recipe is nothing short of food alchemy. It is fascinating to see a cup of crunchy cashew nuts transform into a ball of cheese with the tangy flavor and soft texture of buffalo mozzarella.
I start with a recipe for plant-based mozzarella. I have been a cheese fanatic since I learned about the cheese course at a restaurant in Amsterdam when I was about eight years old. The mozzarella is incredibly easy to make and much better than the commercially available vegan versions I have tried. The mozzarella is followed by a Hungarian Liptauer cheese spread. Next, I added some pickled vegetables for crunch and zest and finished up with Spanish-style chorizo sausage with all the bold flavor of the traditional meat version. Add some dried fruit, nuts, and crackers, and you have a board perfect for a winter get-together!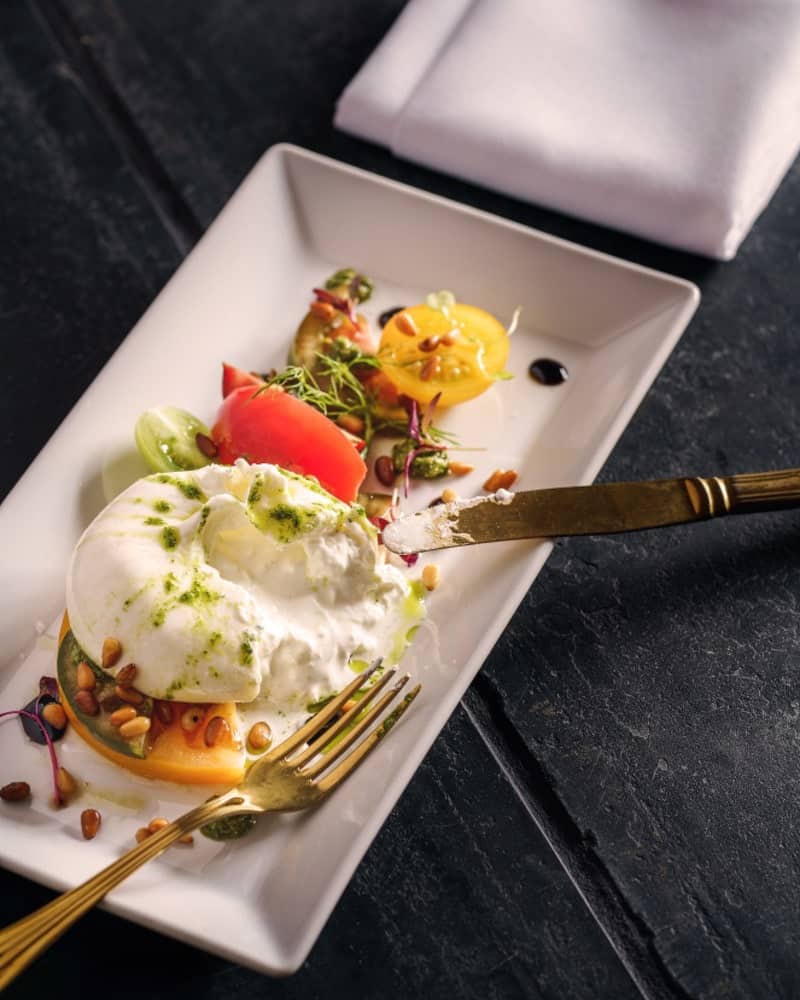
Tip: While I am generally of the opinion that you can cook most things without special equipment, I have learned that a powerful blender is necessary to get the smoothest results for many plant-based recipes. It doesn’t have to be an expensive brand, but it needs to pack a punch.
Vegan Mozzarella
This recipe is nothing short of food alchemy. It is fascinating to see a cup of crunchy cashew nuts transform into a ball of cheese with the tangy flavor and soft texture of buffalo mozzarella. The lemon juice gives the cheese a fresh quality, while the nutritional yeast provides the cheesy umami note. When I use it in lasagna or on pizza, I make a larger ball you can slice. For salads, I make them the size of bocconcini or cherry tomatoes. They can be eaten as soon as they are cool and will keep in the refrigerator for a week wrapped in plastic wrap or a day or two stored in water.
Ingredients
- 1 cup raw cashews
- 1 cup water, plus more for soaking cashews
- 6 Tablespoons tapioca flour
- 2 Tablespoons lemon juice or 1 teaspoon lactic acid
- 2 teaspoons nutritional yeast
- 1 Tablespoon kosher salt
- Equipment: blender, spring-loaded scoop
Directions
Place cashews in a container and fill it with water until it is two inches above the cashews. Let soak for 12 hours.
Have a large bowl filled with ice and water ready. Drain the cashews and place them in the blender. Add 1 cup of water and the remaining ingredients. Process for 2 to 5 minutes until very smooth.
Transfer to a small saucepan. Heat over medium heat, stirring frequently so the mixture doesn’t stick to the bottom. As the mixture comes together and starts to thicken, it will look very lumpy. The lumps will smooth out as you stir. Once the mixture is very thick and starts to pull away from the bottom and sides of the saucepan, remove it from the heat.
While the mixture is still hot, use a spring-loaded scoop to drop balls of the mixture into the bowl of ice and water. Keep the balls of mozzarella in the water until completely cooled.
For best results, wrap the cheese in plastic wrap. It will keep for one week this way and gets easier to slice after a day or two. Alternatively, keep it for a day or two in a container filled with water.
Vegan Liptauer Cheese Spread
I first had this Hungarian cheese spread three decades ago at Sandor’s European Cuisine in Seagrove Beach, Florida. Thanks to its creamy texture and bright seasoning, it was love at first bite. I am thrilled that, once again, I can enjoy Liptauer. This recipe makes about two cups of spread and will keep in the refrigerator for a week. It is even better the day after it is made and all the flavors have had time to hang out together.
More and more people are going plant-based, whether for their health or their concern for animals and the environment.
Ingredients
- 2 cups raw cashews
- 1/4 cup water, plus more for soaking
- 2 Tablespoons lemon juice
- 1 teaspoon kosher salt
- 1/2 cup vegan butter, softened (optional)
- 1 teaspoon (about 2–3 cloves) garlic, minced with a sprinkle of salt until a paste forms
- 1/4 cup onion, minced
- 2 Tablespoons of capers, chopped
- 2 teaspoons ground caraway
- 4 teaspoons sweet paprika
- 2 teaspoons Dijon mustard
- Equipment: blender
Directions
Place cashews in a container and fill it with water until it is two inches above the cashews. Let soak for 12 hours.
Drain the cashews and place them in the blender. Add 1/4 cup of water, lemon juice, salt, and butter. Process for 2 to 5 minutes until very smooth.
Place the mixture in a medium bowl and add the garlic, capers, caraway, paprika, and mustard. Fold in the ingredients until well incorporated.
Serve chilled on crackers or use as a dip for vegetables or chips.
Pink Onions
These pickled onions are so pretty with their pastel pink color. They are a breeze to make and will keep in the refrigerator for four weeks. They are sweet and tart and are excellent on sandwiches, salads, and crackers with cheese.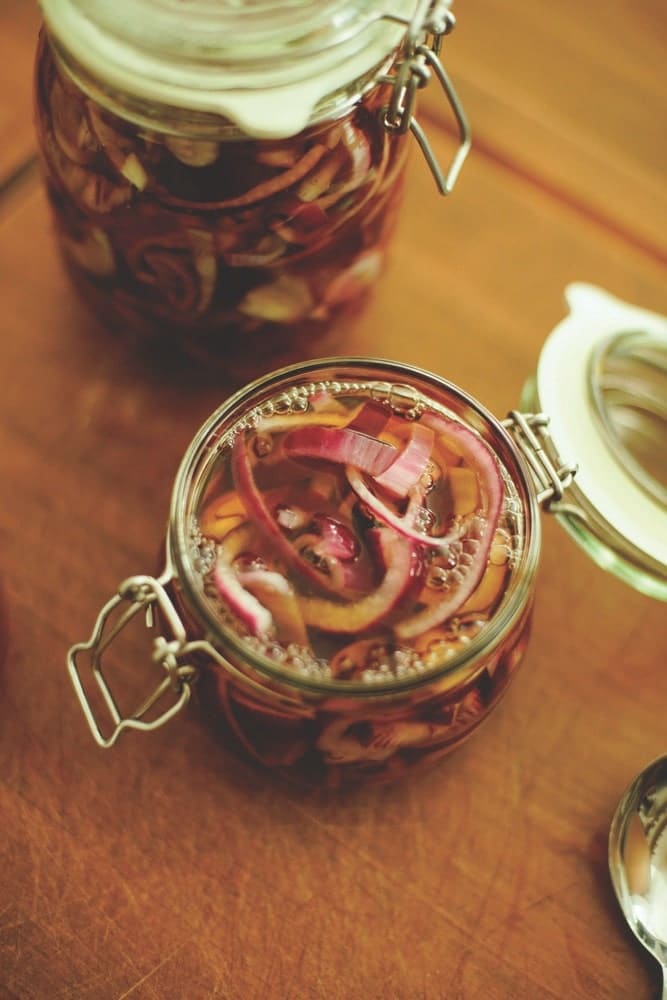
Ingredients
- 2 cups of thinly sliced red onion
- 1 cup apple cider vinegar
- 1 cup sugar
- 2 cups water
- 2 teaspoons black peppercorns (optional)
Directions
Place the onions in a medium bowl.
Add everything except the onion to a small saucepan and bring it to a boil. Be sure to stir from time to time so the sugar doesn’t stick to the bottom of the saucepan. Once the mixture comes to a boil, pour it over the onions and let it cool to room temperature. Once cool, transfer the onions and liquid to a glass container and refrigerate.
Pickled Cauliflower, Carrots, and Jalapeños
These are my favorite pickles. They can be made with just a few minutes of effort and enough time to cool. The coriander seeds are wonderfully fragrant, while the jalapeños provide zip. They are just the right amount of sweet and tangy. If you want a less spicy pickle, remove the seeds and membrane from the jalapeños or omit them if you prefer. Other vegetables can be used here, so mix and match your favorites. If you like crunchy pickles, make them as described below. If you want a softer pickle, blanch the cauliflower and carrot for 1 to 2 minutes before adding the pickling liquid. They will keep for about four weeks in the refrigerator (but they will probably disappear long before that).
Ingredients
- 1 head of cauliflower
- 3 large carrots
- 1 1/2 cups white wine vinegar
- 1 cup water
- 2 bay leaves
- 1 teaspoon black peppercorns
- 1 teaspoon coriander seeds
- 2 teaspoons salt
- 1/4 cup sugar
Directions
Place the vegetables in a glass container (I use two large canning jars).
Add the remaining ingredients to a small saucepan and bring to a boil. Be sure to stir from time to time so the sugar doesn’t stick to the bottom of the saucepan. Once the mixture comes to a boil, pour it over the vegetables and let it cool to room temperature. Once cool, refrigerate.
Vegan Chorizo
I love Spanish chorizo. I grew up eating it in soups and rice dishes, and I always tried to sneak a slice or two before it went into the pot. This plant-based version is incredibly close to the original. The texture is firm but not quite as chewy, and the flavor is right on point. Pimentón (smoked paprika) provides smokiness and that deep red color. Fresh and powdered garlic team up for a layered taste. A touch of white wine adds just the right amount of acidity. If you don’t drink wine, replace it with 3 tablespoons of water and 1 tablespoon of fresh lemon juice. The coconut oil starts to solidify as it cools, making it act much the way pork fat does in the original. This recipe takes a bit more effort than the others but is well worth it. It is delicious on its own, but to add it to other dishes, heat it in a skillet and add it halfway through cooking so it retains its shape. It will keep for a week in the refrigerator.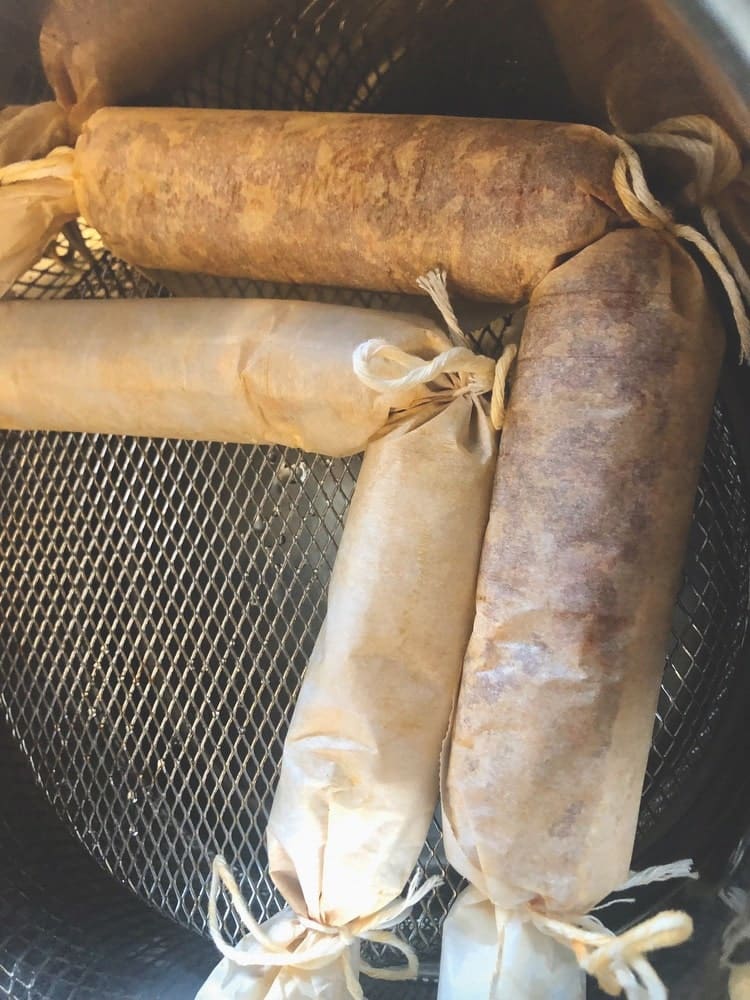
Ingredients
- 2 tablespoons refined coconut oil
- 1/2 cup onion, finely chopped
- 3 Tablespoons (about 8 cloves) garlic, minced
- 1/4 cup pimentón (smoked paprika)
- 1/4 cup texturized vegetable protein
- 1/4 cup white wine
- 2 Tablespoons soy sauce
- 1/2 teaspoon ground black pepper
- 1 teaspoon garlic powder
- 2 teaspoons oregano
- 1 teaspoon salt
- 2/3 cup vital wheat gluten
- Equipment: kitchen twine, parchment paper, steamer basket, sushi mat (optional)
Directions
In a medium skillet, melt the coconut oil. Add the onion and cook, stirring frequently, until it begins to brown. Then stir in the garlic and remove from the heat.
In a large mixing bowl, place the pimentón, texturized vegetable protein, white wine, soy sauce, pepper, garlic powder, oregano, and salt. Stir in the onion and garlic.
Add the vital wheat gluten and stir until it is completely incorporated and forms a dough. Place the dough on a piece of parchment paper and knead for 3 to 4 minutes. Note that the pimentón can stain wood and fabrics. It will wash off hands easily with soap and water.
Separate the dough into two portions.
Place a piece of parchment paper about 8 inches long and 15 inches wide on your work surface. Form a log about the diameter of a quarter near the top of the paper and roll the paper around the dough. A sushi mat can be helpful here. Tie one end of the paper with the twine. Smooth the log, pressing out as much air as possible, then tie the other end. It will look a bit like a Christmas cracker. Add one more tie in the middle.
Add water to the pot you will steam the sausages in and place the bundles in the steamer basket. Steam for 1 hour. Once cool, the chorizo is ready to eat. It slices best when chilled. It tastes best when warm or at room temperature.
— V —
Share This Story!
KEEP UP WITH THE LATEST STORIES FROM VIE